How to Recover Passwords from Multiple Files Using Passcovery Programs
Sometimes we may need to recover more than one password at the same time. One of our users is having a tough time recovering his 5 RAR files. In this video you’ll see how to pull this off.
In this case we will demonstrate how to configure batch recovery of passwords using Accent RAR Password Recovery – our program for searching RAR passwords. You will learn how to get the same (or even better!) results while recovering passwords with any other Passcovery program. All our tools have the same interface.
Should you have any problem or questions, or no problem at all and you feel super satisfied, please like the video and write a comment or a message to our help desk. We will reply as soon as possible.
Now let's go!
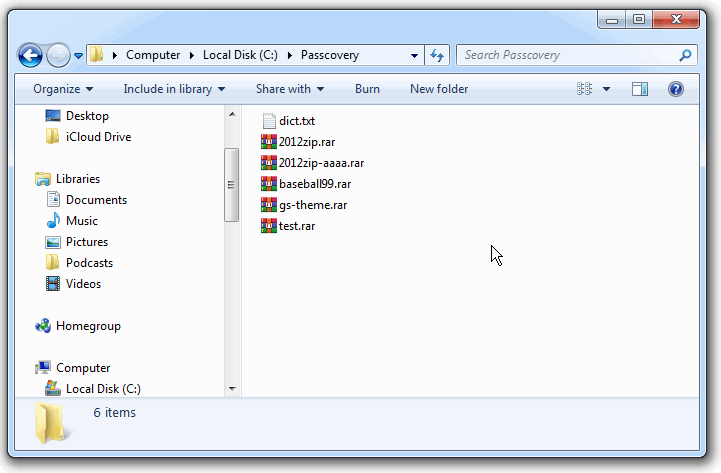
So what we have is 5 RAR files and a dictionary. With the help of the program I will consecutively check all passwords from the dictionary for all the five files (it may not only be dictionary attacks, of course, other attacks are also possible).
I will use Windows batch file (cmd file) repeatedly execute AccentRAR for each RAR file located in the folder. The attack scenario with a specific RAR file name will be linked up to AccentRAR. As soon as the program completes all the attacks described in the scenario for the file, it will close, and Windows will restart the cycle for the next RAR-file.
Passcovery programs support various attack scenarios. You can configure as many attacks as you need. The program will work according to the given scenario by launching attacks one after another until it finds the password or completes the entire scenario. That is how you can launch a password attack on all fronts.
Now let us start our real-time step-by-step guide.
Batch Recovery of Multiple Passwords
Step 1. Create a new folder with all the files and the dictionary. My folder path is "C:\Passcovery\". The RAR-files and dictionary dict.txt are in the folder.
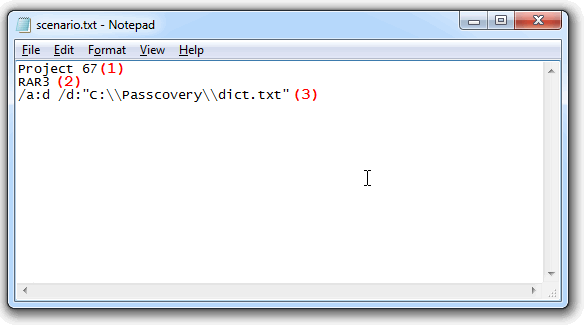
Step 2. Create a scenario with a list of required password attacks and save it in the same folder.
I have created a text Unicode file "scenario.txt". The file contains three lines:
- scenario name (1)
- file format to which the scenario can be applied (2)
- attack description (3):
/a:d /d:"C:\\Passcovery\\dict.txt" — that stands for a dictionary attack (/a:d) with the specified dictionary name and location (/d:"dictionary file path, enclosed in quotes" (Important: double backslash designates nesting levels of folders))
You can configure more and completely different attacks. All you need to do is describe each attack in a separate line. The program will apply all of them one by one for each file.
For more details on creating scenarios, see our help file about Passcovery tools.
Please note: our programs can only read scenarios in Unicode format. We recommend to use Windows Notepad to edit and save files. This program is available in your Windows system and it is enough to complete the task.
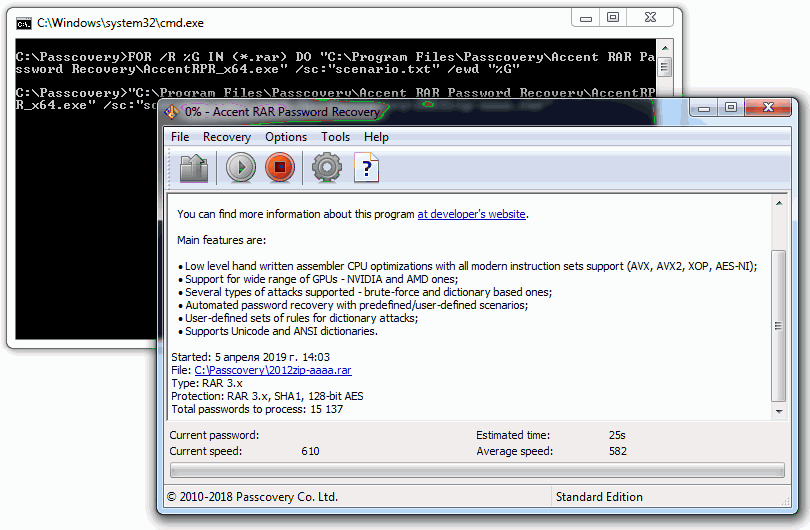
Step 3. Create a .cmd file for cyclic execution of Passcovery and save it to the project folder.
In this example it is a regular text file cmd.cmd with a single command:
FOR /R %%G IN (*.RAR) DO "C:\Program Files\Passcovery\Accent RAR Password Recovery\AccentRPR_x64.exe" /sc:"scenario.txt" /ewd "%%G"
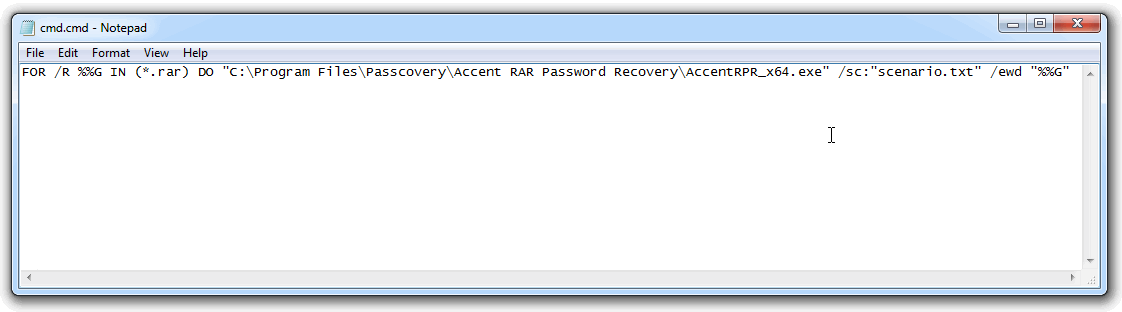
The cyclic command FOR /R %%G IN (*.RAR) DO AccentRPR_x64.exe %%G will find all the RAR-files in the current folder and execute AccentRAR with the given parameters for each of the files.
Make sure you specify full path to the program file. The qualifier /sc links up the scenario created in the previous step, and /ewd closes the program when the attack is completed and restarts the program to process the next RAR file.
Now that I can start batch recovery of passwords, let us see what I have got in the project folder:
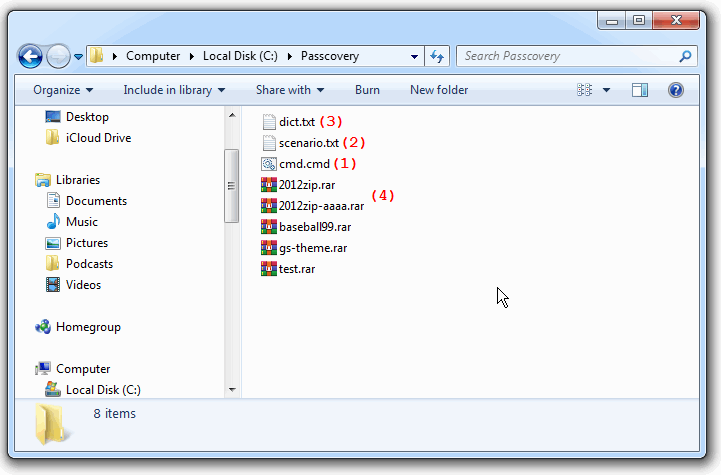
That is how it is supposed to look:
- one batch file (.cmd file) (1)
- one scenario file (2)
- dictionary file(s) (if you choose dictionary attack) (3)
- password protected files (4)
Step 4. Run the batch file (.cmd file) with a double click as you usually do with regular program files.
And let the magic begin! ッ
I see AccentRAR starting with a RAR-file from the folder, successful recovery of one file and failed dictionary attack of another. I see other files processed until they are all done.
Step 5. You can view the results of batch recovery in AccentRAR or in any text editor. The results are saved as a separate txt file in the source folder.
Here is what I got:
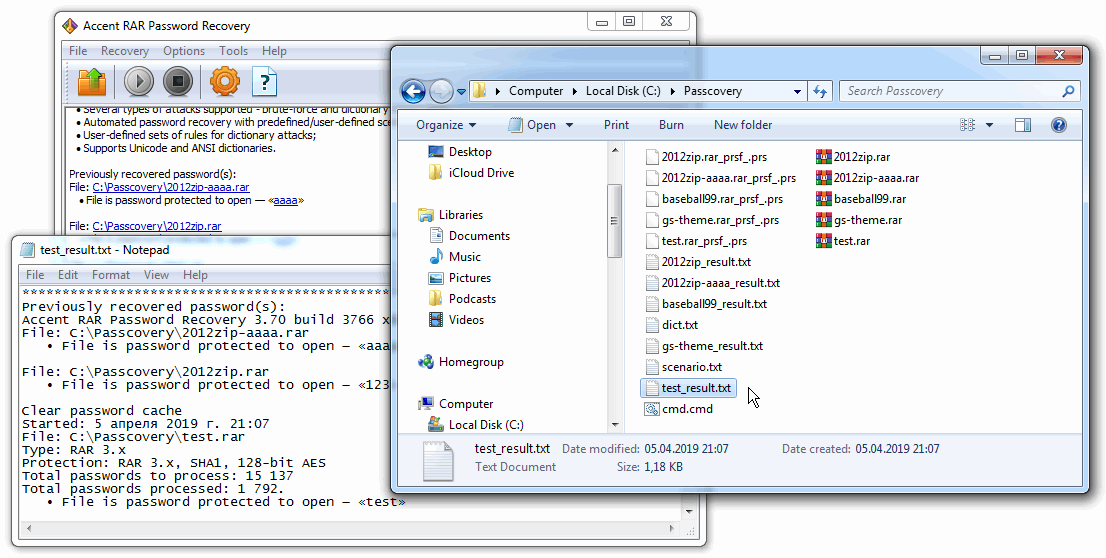
The program consecutively worked through all the RAR-files, completed the attacks from the scenario and found passwords where it was possible with the given attacks. Now you can remove the files with recovered passwords from the project, change the attack scenario and repeat the search.
That is how it works.
Frequently Asked Questions about the Scripting Language in Passcovery
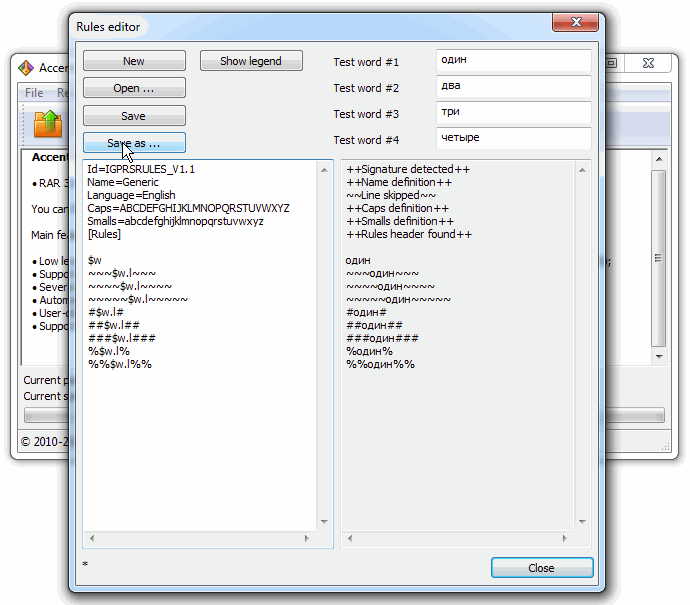
Question: How do I batch process five files with a dictionary attack with mutations? For example:
~~~$w.l~~~ ~~~~$w.l~~~~ ~~~~~$w.l~~~~~ #$w.l# ##$w.l## ###$w.l### %$w.l% %%$w.l%%
Answer: That will not be much harder. First, you need to create a file with mutation rules (for example, rules.txt). It is recommended to use the Rules Editor:
Then describe the attack in the scenario file and specify the path to the rules and dictionary. Like this:
/a:r /r:"C:\\Passcovery\\rules.txt" /d:"C:\\Passcovery\\dict.txt"
Question: How can I do a brute force with a charset of all digits and/or all letters?
Answer: If you need a simple brute force attack, this is how you describe it in the scenario:
/a:b /c:sd /min:3 /max:5
/a:b – brute force attack
/c:sd – low-case letters and digits
/min:3 – minimum length
/max:5 – maximum length
Question: How do I specify in the scenario an extended mask if the first character is from the charset "QWER", the next 4 characters are from the charset "asdfghjkl;", and the last one is a digit?
Answer: In this case, you need to describe your custom charsets and then configure the mask. Like this:
/a:m /c: /1:QWER /2:asdfghjkl; /m:?1?2?2?2?2?d
/a:m – extended mask attack
/c: /1:QWER /2:asdfghjkl; – description of the first and second charsets
/m:?1?2?2?2?2?d – mask based on custom charsets defined by user: charset 1 corresponds to position 1, charset 2 – the next four positions, and one digit (0-9) at the end
Read more about the use of extended masks in this article.
Question: How do I “glue” two, three or four dictionaries while batch recovering multiple files?
Answer: With Passcovery programs you can generate a password by "glueing" several dictionaries and modify the obtained word before testing it. Here's a step-by-step guide.
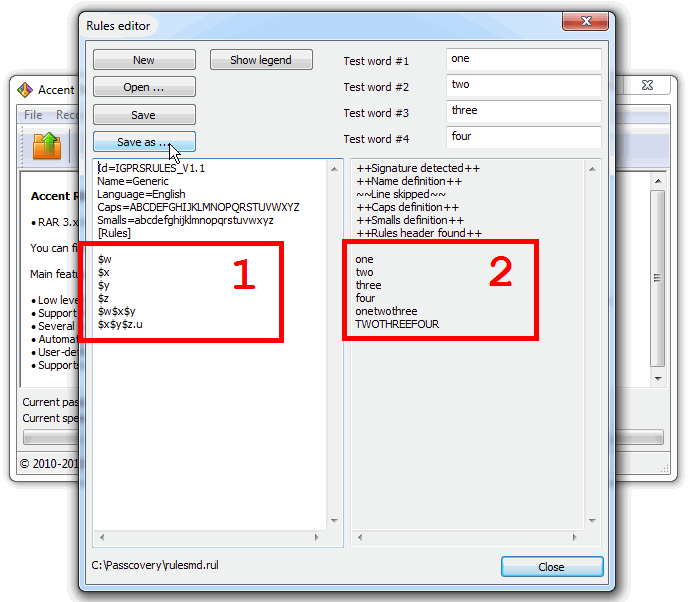
1. Get the dictionaries ready. We are going to use these dictionaries: 1.txt, 2.txt, 3.txt, 4.txt.
2. Create a rules file. See the file rulesmd.rul:
$w – checking the wordlist of dictionary 1
$x – checking the wordlist of dictionary 2
$y – checking the wordlist of dictionary 3
$z – checking the wordlist of dictionary 4
$w$x$y – checking the password generated by “glueing” dictionaries 1, 2 and 3
$x$y$z.u – checking the password generated by “glueing” dictionaries 1, 3 and 4 in UPPERCASE
3. Create a scenario file. See the file scenario_rulesmd.txt linked to the rules file and dictionaries in the required sequence:
/a:r /r:"C:\\Passcovery\\rulesmd.rul" /d:"C:\\Passcovery\\1.txt" /d:"C:\\Passcovery\\2.txt" /d:"C:\\Passcovery\\2.txt" /d:"C:\\Passcovery\\2.txt"
4. Create a command file. See the file cmd_rulesmd.cmd:
FOR /R %%G IN (*.RAR) DO "C:\Program Files\Passcovery\Accent RAR Password Recovery\AccentRPR_x64.exe" /sc:"scenario_rulesmd.txt" /ewd "%%G"
5. Run the command file.
See more details about the types of attacks and additional elements in scenarios in the help file and online manual.
Then go to Step 4 — run the command file with the required attack scenario.
Passcovery Programs for Password Recovery
Archive with files from the examples in the video (cmd file, scenarios, mutation rules file, dictionary, RAR files): zip-archive
* * *
Even though there is no built-in batch mode in Passcovery programs, this method of batch recovery of multiple passwords works perfectly well. It is especially useful when you need to apply the same pattern to several files of the same type.
If you have any questions or comment please share your thoughts below the video or write to our helpdesk. We are always there to help you.