5++ Methods to Crack a PDF Password and Unlock a PDF File. All Password Attacks
A forgotten or lost Document Open Password for a PDF document can become a problem. It is impossible to open a password protected file without entering the password. Learn all about the methods of cracking such passwords and see how to unlock PDF documents effectively. Here's everything you need to know.
Password protection in PDF
There are two options to secure a PDF file with a password (official documentation). Each security option is meant for its own purpose, both having its own quality (strength) of protection.
- Permissions Password (Master password). This is a weak protection that restricts certain actions with a file: you can open it and view the content, but printing and editing are restricted. You can easily remove or bypass a permissions password in a couple of minutes. No matter how complex and unpredictable a password might be.
- Document Open Password (PDF User password). This security option offers strong password protection with reliable encryption of a PDF file content. You cannot open a locked file without entering the password. To open it you will have to recover the password by using a brute force attack. Obviously, this will take time and a high-speed software tool with advanced features.
Let's take one such tool by Passcovery Co. as an example and learn how to crack PDF passwords. You will see when and which password attacks you'd better go with and learn how to use them.
| Accent PDF Password Recovery for Adobe PDF all versions |
AccentPPR removes the «Master Password» instantly at the moment of opening the PDF file. A double click and it's all over. Literally in the blink of an eye. Sounds quite boring, doesn't it.
It gets way more fascinating when it comes to cracking the «Document Open Password». The tool we are about to show you has got numerous advanced features in store and several types of password attacks. Let's take a closer look at them.
- Brute force attack
- Brute force with mask attack
- Brute-force with extended (positional) mask attack
- Dictionary attack
- Dictionary merge and mutation attack
- Configurable attack scenarios
Brute force attack
This is the most primitive and time-consuming yet rather effective hacking technique. Basically you define a range of possible passwords by specifying a set of characters and the password's length. The program will then consistently generate and test all possible combinations of those characters trying to guess the password.
How it works
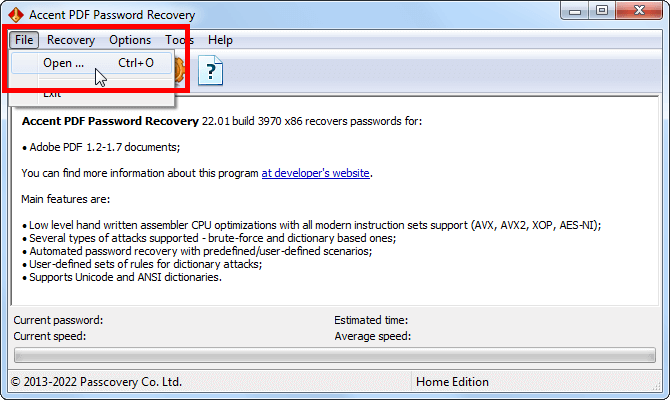
1. Start AccentPPR and open a locked PDF file:
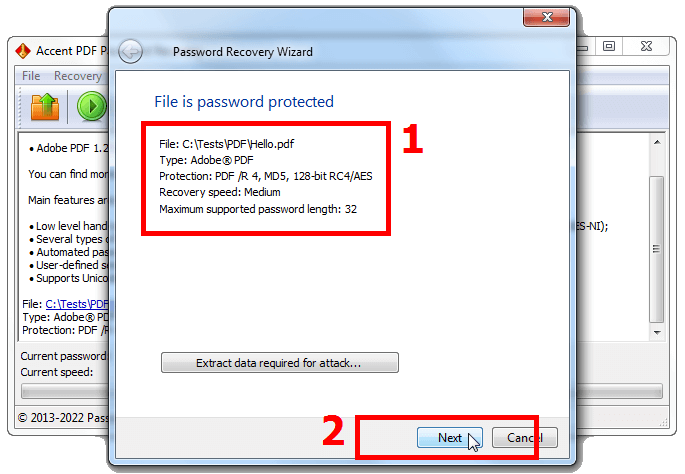
2. Read the information about the security option enabled in your file and proceed (please disregard the «Extract data…» button. It is not relevant here):
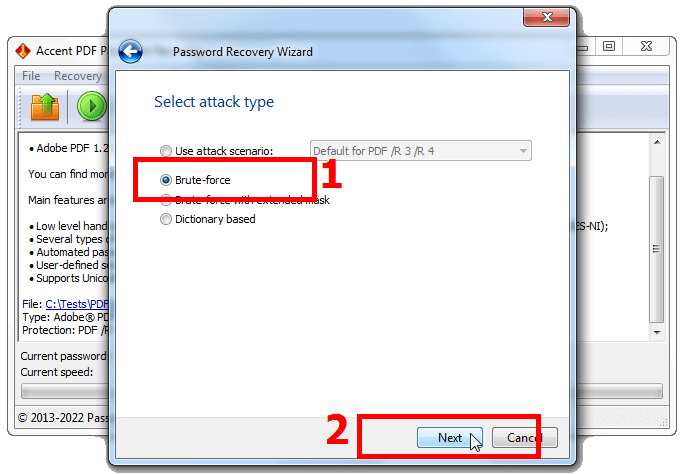
3. Select «Brute force attack» and go to settings:
4. Here you can select the alphabet, specify the required sets of characters to generate password from (lower- and upper-case characters, numbers, special characters), specify the minimum and maximum password length, and run the attack:
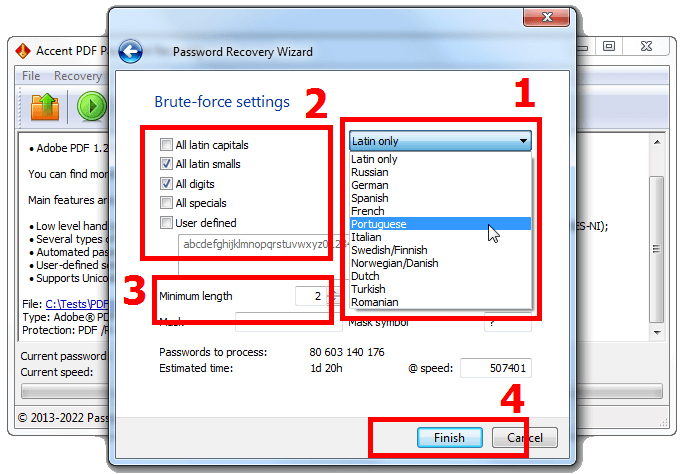
Please note: if you select User defined, you will be able to edit (extend or reduce) the chosen character set.
Already at the setup the program calculates the number of combinations to check and shows the approximate time it will take to process the entire range. However the actual search may take much less time. That is, of course, if the right password is actually there in the specified range 😉
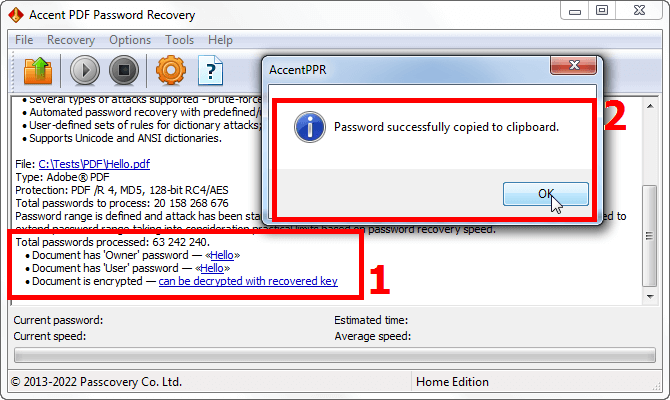
5. AccentPPR will then run a brute force attack. The program generates and tests all passwords according to the specified parameters. Once the right one is found, it will show it on screen. Click on the password to copy it to the clipboard:
Brute force with mask attack
You would want to choose the attack when you know a part of the password. You basically apply the same old brute force attack but you only do the settings for the lost part of the password. So the program generates the unknown part only. This way you cut the range of combinations to be tested and speed up the search.
How it works
1. Follow the same steps as with the regular brute force attack: run the program, open the file, view the information about it, select «Brute force attack» and do the password generation settings.
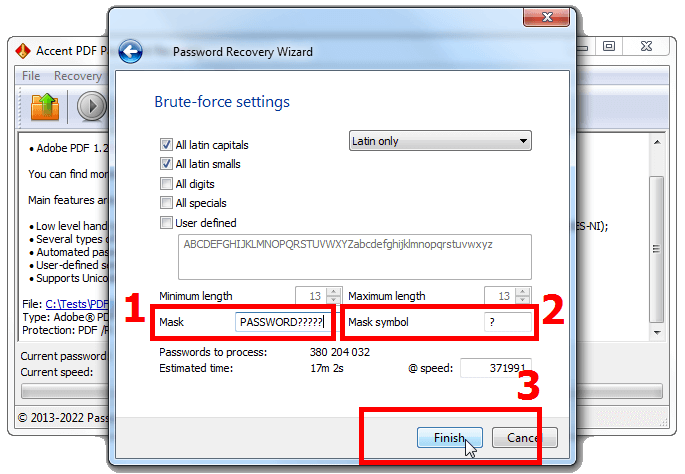
2. Enter the known part of the password into the «Mask» box and type in the unknown part using the mask symbol. By default it is «?», however you may set your symbol in the «Mask symbol» box:
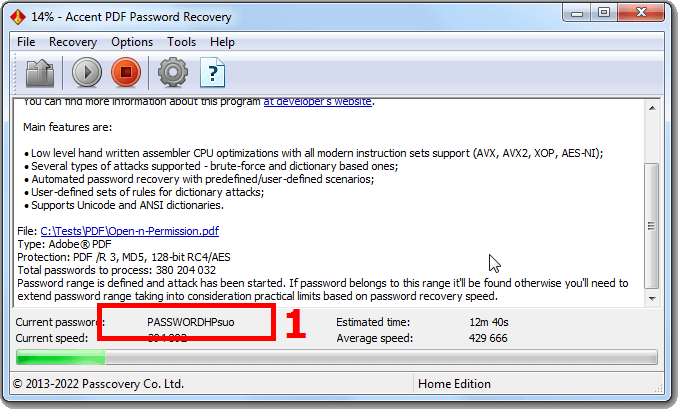
3. Run the attack and wait for the result. The program will generate the unknown part of the password according to the specified rules, while leaving the known part unchanged:
Brute-force with extended (positional) mask attack
This is the most advanced technique to generate passwords in AccentPPR. It is the most useful when you know at least some information about the structure of the lost password. The extended mask enables you to define character sets individually for each position in the password and cut off heaps of unnecessary tests. The program will generate passwords within the limits of the specified character sets thus immensely reducing the search time.
How it works
1. Run the program, open the file, review the file info, select «Brute force with extended mask» attack as we did before.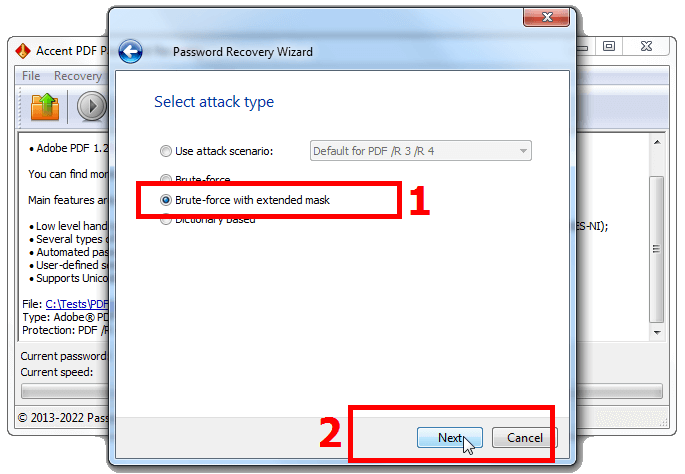
2. You may specify up to 10 sets of characters that can occupy each position in the password.
For example, the first character is a capital consonant, the password ends with two digits, and in the middle there are only lowercase letters with an underscore. That is, your password will be comprised of three character sets. Let's see how to configure this mask.
Passcovery programs use a macro language that helps to describe the structure of passwords to be generated. All you need is to link a character set to each position in the password.
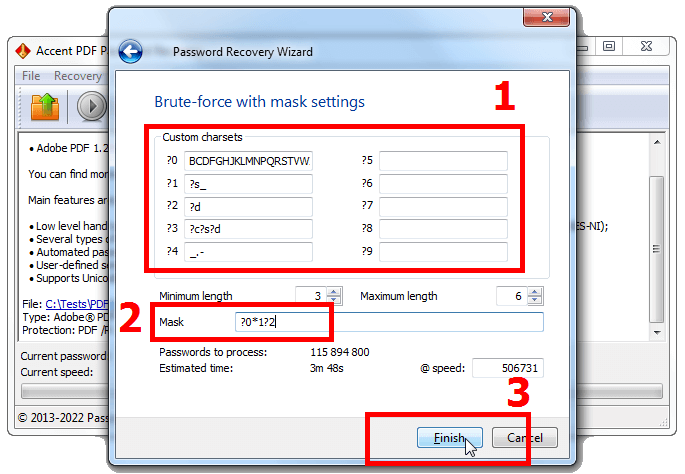
It may seem a little complicated at first, but after a few trial steps you are sure to get the point. You should definitely look at the variety of templates of extended masks prepared by Passcovery.
3. Run the attack and watch the process. When the password is found, copy it to the clipboard with a single click.
By the way, you can't but notice just how much faster it searches a PDF password compared to the conventional brute force attack. 😉
Dictionary attack
Now this is probably the fastest password recovery technique. You go with it when you know nothing about the password. However, it will only work when the password is an existing or well-known word (or a word form) that is listed in the word lists or the so-called dictionaries. You simply link an appropriate dictionary and the program tests the passwords from that dictionary.
How it works
1. Run the program, open the file, review the file info, select «Dictionary Attack»
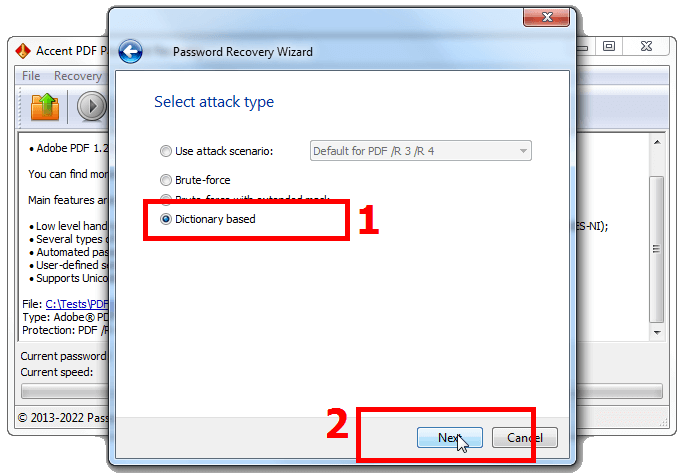
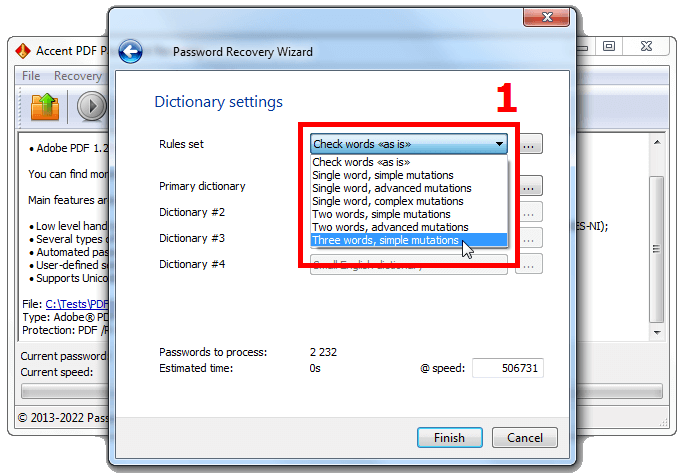
2. Select a set of dictionary mutation rules. By default, the option allows you to link up to three dictionaries that will be slightly modified during the attack in accordance with the algorithms pre-defined in the program.
3. Link up all the dictionaries available. These can be simple dictionaries from the list that are stored in all Passcovery programs. Or you can click on the three dots and enable any of your dictionaries.
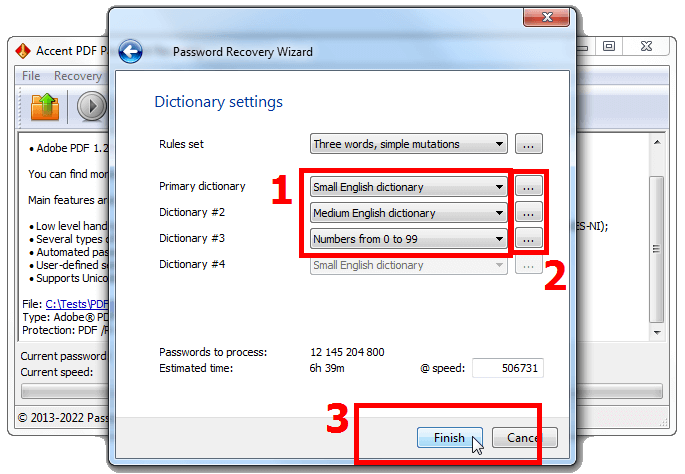
There is a huge number of dictionaries out there in various languages with a variety of mixed and specialized entries. You can download such dictionaries here or here.
While you are selecting sets of rules and dictionaries, AccentPPR is already calculating the number of passwords and the approximate time needed to check the ENTIRE range.
4. Follow the same steps: run the attack, monitor the process, click on the recovered PDF password to copy it to the clipboard.
Dictionary merge and mutation attack
This is another advanced attack featured by AccentPPR. Now let's learn some more details about the dictionary attack. You may link up to 4 dictionaries to the attack, glue words together from those dictionaries and change them as you wish. The program enables you to change the case of characters, substitute characters, shuffle words and do other similar things. It offers great opportunities to manage mutation of dictionary entries.
How it works
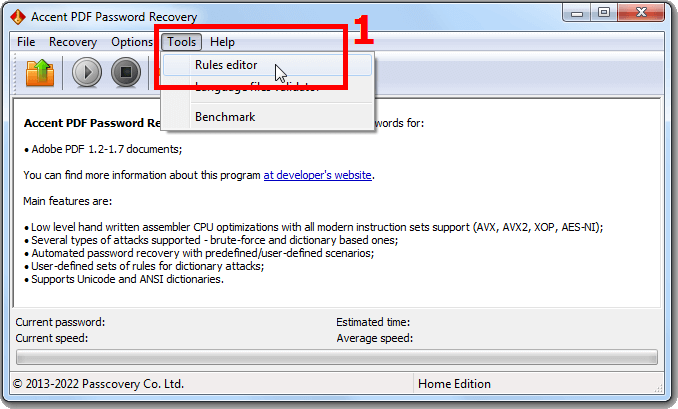
1. Start AccentPPR and run the «Rules Editor»
2. Create a new set of rules and click «New»
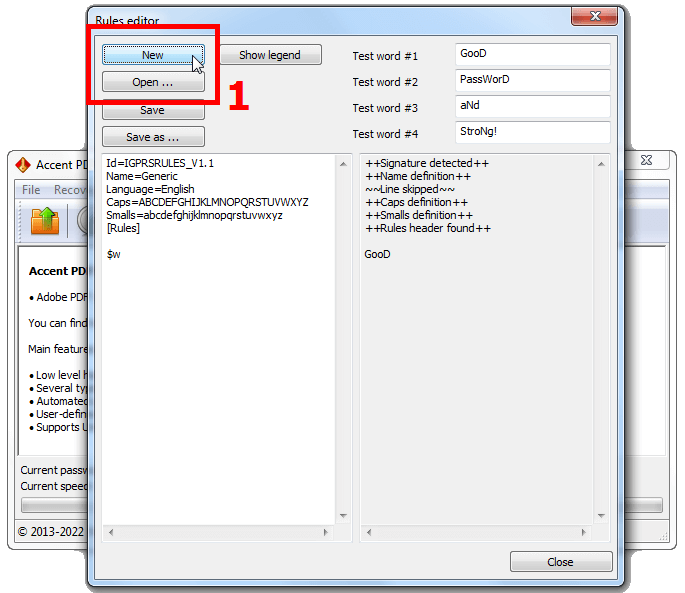
Or you could open a previously created file with the attack rules (click «Open…») and edit it.
3. Set up the required set of rules to enable merging and mutation of dictionaries. You may configure a unique mutation of words from different dictionaries and then gluing them together, or vice versa, combining words from different dictionaries followed by their mutation. There can be as many variations as possible. Your only limits are your needs and imagination.
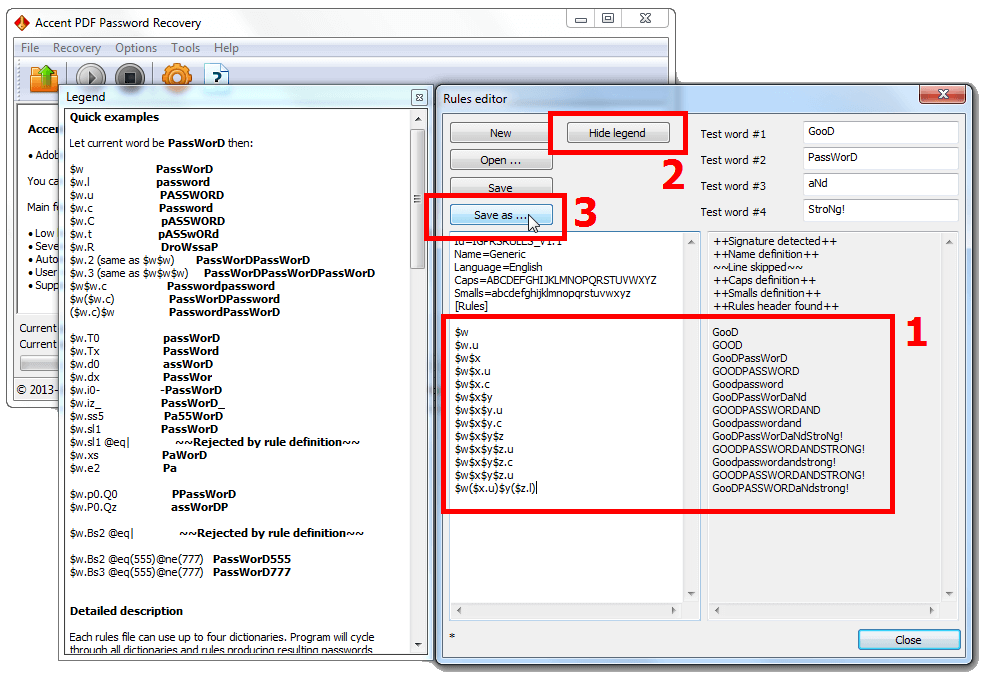
To use the rules more effectively it is recommended to view hints and tips about macros (the «Show legend» button).
Basically, when you enable the macros to combine and mutate entries in the left part of the «Editor», at the same time you will see a preview of the result displayed in the right part showing a few test words from template dictionaries No. 1 - No. 4. This is very convenient and makes the setup process more enjoyable.
4. Save your set of rules to a file («Save as…»), close the «Rules Editor» and return to the main window of the program.
5. Run your locked PDF file, select «Dictionary Attack» and in the settings window select the saved rules file.
Specify the dictionaries that you wanted to engage with your set of rules.
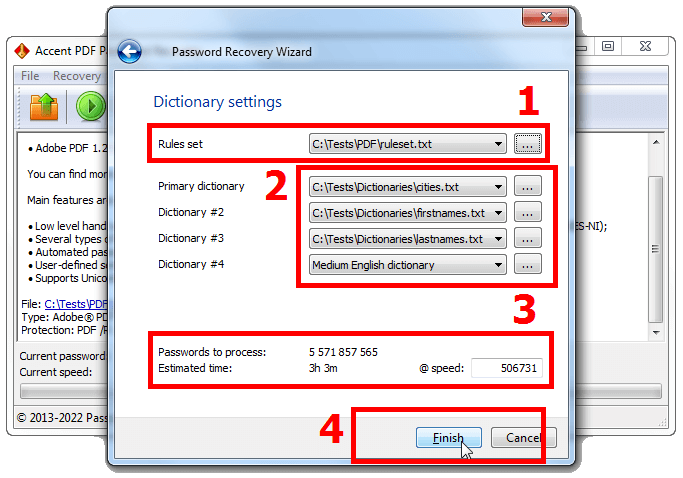
The program will then calculate and display the number of passwords to be tested. The size of all connected dictionaries and mutations being considered, the program will display the estimated time to test ALL those mutated passwords.
6. That's basically it. Click «Finish» and await your recovered PDF password.
See more cases with dictionary mutation attacks using Passcovery programs here and here.
Configurable attack scenarios
This is perhaps the most advanced and sophisticated way to attack a PDF password in AccentPPR. With this technique you create an attack scenario or a chain of sequentially executed attacks, and the program runs all of them one by one. You may as well set up a cascade of attacks, from simple to complex, the range being expanded with each attack in the scenario.
How it works
The method consists of several critical steps each one being substantially described. Therefore, it is highly recommended to read our separate article on the use of attacks with custom scenarios: «Batch passwords recovery in the Passcovery apps».
Conclusion
To be able to unlock PDF passwords effectively, learn and master all the password recovery methods described here. You may as well use these attacks with other Passcovery tools to crack other types of strong passwords. They all share the same underlying principle that is a brute force attack. ru pt
Three common how-tos about PDF files
To do this, you will need a full-fledged editor Adobe Acrobat DC. Using Acrobat Reader you will not be able to remove the restriction. Acrobat Reader only lets you see the enabled restrictions.
Open the PDF file. Use the “Menu” → “Document Properties...” menu (hotkeys “Ctrl+D”) to open the document properties window. In the In the “Security” tab, you will see the restrictions that have been set. Click “Change Settings…”, enter a password, and disable password protection in the “Password Security” window. Save the changes to the PDF file.
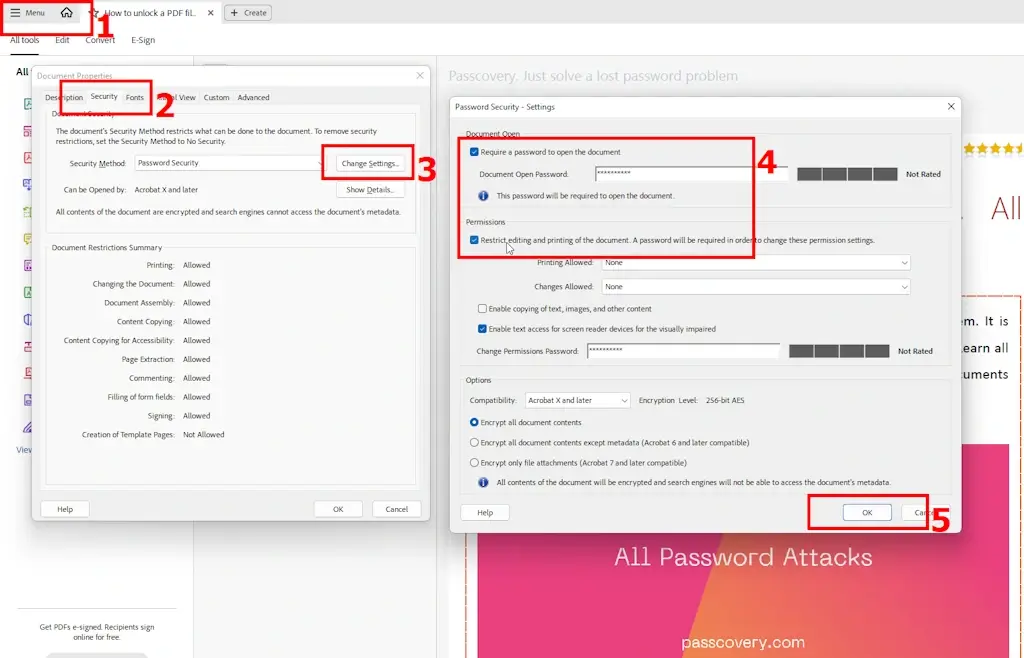
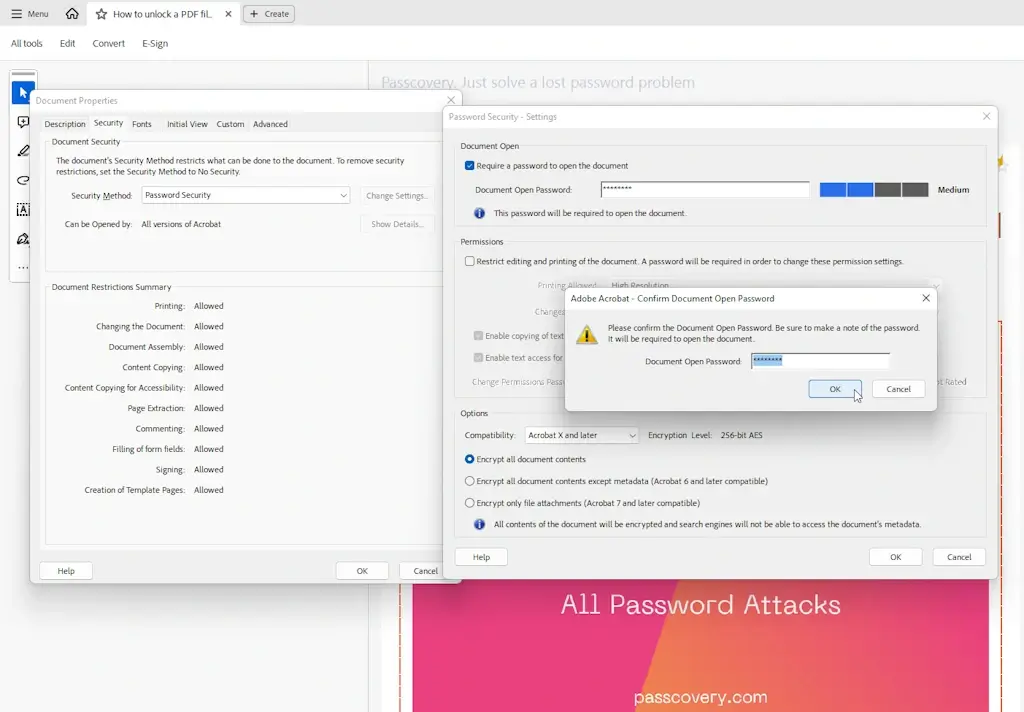
- Launch Adobe Acrobat Pro (this cannot be done in Adobe Acrobat Reader).
- In the “File”→“Document Properties...” menu, open the document properties window.
- Open the “Security” tab.
- In the “Security Method” drop-down menu, select “Password Security”
- Click the “Change Settings...” button button and set the desired level of protection and password in the new window
- Click “OK” and confirm the password by re-entering it
- Save the password-protected PDF file
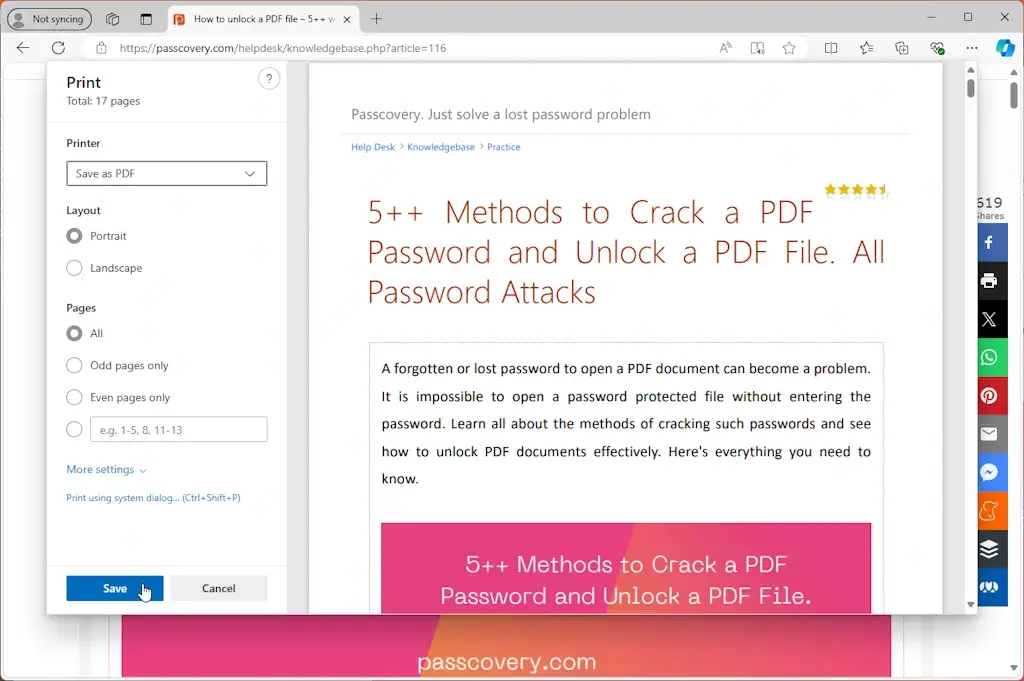
This can be done easily and simply in any browser.
Open the “File”→‘Print’ menu (hotkeys “Ctrl+P”). In the drop-down list of printers, select “Adobe PDF” or “Save as PDF”. Select which pages you want to save in PDF, their orientation, “paper” size, and color. Click “Print”, specify the file name and where you want to save it.
That's it: the website page is now saved as a PDF.
Disclaimer: The information provided is intended solely for educational and legitimate purposes of the user. The methods and examples described are intended to restore access to your own files and passwords. Any other use may be illegal — the user is responsible for complying with applicable laws.


